How to Verify ID on X (Formerly Twitter): A Complete Guide
If you’re looking to get your identity verified on X (formerly Twitter), you’re in the right place. Verifying your ID on X not only boosts your credibility but also unlocks features that enhance your visibility and trust on the platform. In this guide, we’ll walk you through how to verify your ID on X step-by-step, why it matters, and common issues to avoid.
Why ID Verification on X Matters
Getting verified on X offers several key benefits:
Builds trust with followers
Enhances profile credibility
Unlocks access to premium features
Reduces the chances of identity impersonation
Improves visibility in search and conversations
Who Can Use X to Verify Their ID?
On X, anyone can apply for verification; nevertheless, fulfillment of specific requirements is required for approval. These consist of:
A full profile, including a name, photo, and bio
A verified phone number and email address
No recent infractions of the rules
A paid subscription or a public interest account (for heritage blue checks)
Since 2023, X has also offered a more secure, government-issued ID-based approach for ID verification for premium users (X Premium).
Step-by-Step: How to Verify Your ID on X
Here’s how to complete ID verification on X:
Step 1: Log Into Your X Account
Go to x.com and log in using your credentials.
Step 2: Subscribe to X Premium (if required)
If you are not already an X Premium subscriber, head to:
-
Settings > Premium
-
Choose a subscription plan and complete payment.
-
ID verification is currently available to Premium subscribers in select regions.
Step 3: Start the ID Verification Process
-
Navigate to Settings > Account > ID Verification
-
Click “Start Verification”
Step 4: Upload Your Government-Issued ID
You’ll be prompted to upload a valid, government-issued photo ID such as:
-
National ID Card
-
Passport
-
Driver’s License
Make sure the image is clear and not edited.
Step 5: Take a Live Selfie
To confirm your identity, X will request a real-time selfie that matches your ID photo.
Step 6: Submit and Wait for Approval
Once you’ve submitted the documents:
-
X will review your application
-
You’ll get a notification once it’s approved or denied
-
You’ll see a verified check mark on your profile
-
You may get access to additional safety features, like enhanced protection against impersonation
-
Your account may gain higher visibility in replies and search
Verification typically takes a few minutes to 24 hours.
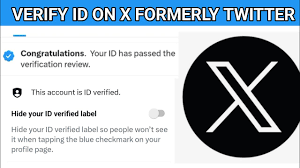
What Happens After ID Verification?
Once verified
-
You’ll see a verified checkmark on your profile
-
You may get access to additional safety features, like enhanced protection against impersonation
-
Your account may gain higher visibility in replies and search
Common Issues & How to Fix Them
Here are some reasons ID verification might fail—and how to solve them:
| Issue | Solution |
|---|---|
| Blurry ID image | Retake photo with better lighting |
| Mismatched selfie | Ensure your selfie matches your ID closely |
| Unsupported ID type | Use an accepted government-issued ID |
| Regional unavailability | Wait until the feature is available in your country |